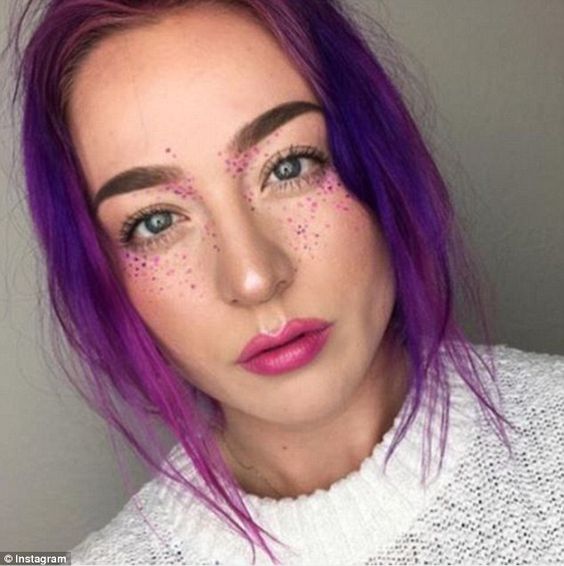
Friday, February 5, 2016
2016, Say Hello to Glitter Freckles.
Friday, November 13, 2015
Glitter Roots: The "Can't Make it to The Salon" Solution
- Brush out your hair. When adding glitter to your roots, the last thing you want to deal with are tangles. Trust us.
- Part your hair. Parting down the middle seems to be the most popular.
- Mix glitter in your hair gel.
- Apply to roots with a brush.
- You're all set and ready to go!
A photo posted by Danielle Plowman (@danielle_ellieellie) on
With the holiday season here you will have plenty of opportunities at holiday parties, family get togethers, and movie premiers to rock your glitter roots. We can totally see this trend making a debut at the new Hunger Games and Star Wars premiers, can't you? With the increasing popularity, you probably won't be the only one with some sparkle in your hair ;).
So is this the kind of trend you'll be trying this season? What occasion do you think it's perfect for? Share your creations with us and tell us what you think below in the comment section! In the meantime, check out the below glitter roots for some inspiration :).
A photo posted by Topganic (@topganic) on
A photo posted by Myhairguru (@myhairguru) on
A photo posted by 💋 (@dragcentral) on
Friday, August 28, 2015
Using Glitter Powder and Hexagons Together
Brown #gradientmani with lots of #hexagonglitter
#brownglitter
https://t.co/Q0bYcGbrA5 pic.twitter.com/ZFFXn37Bz4
— Glitties Nail Art (@rockstartoes) August 24, 2015
Here's a beautiful brown gradient mani with a combo of hexagons and glitter powder. We're loving this one because it's the perfect color for the upcoming fall season!All You'll Need:
- Hexagon glitter
- Glitter powder
- Different shades of brown polish
- Blending sponge
- Sealing and Bonding Formula
Gold and pink #cheetahnails with #hexagonglitter
#goldglitter
https://t.co/oJKJzWdeVL pic.twitter.com/L7Csfed4WV
— Glitties Nail Art (@rockstartoes) August 23, 2015
All You'll Need:
- Hexagon glitter
- Glitter powder
- Polish of your choice
- Blending sponge if you choose to create a gradient
- Sealing and Bonding Formula
- Charm (if you choose to)
All You'll Need:
- Silver hexagon glitter
- Silver glitter powder
- Purple polish (or any color you prefer)
- Silver polish
- Nail tape to create the checkerboard nail
- Sealing and bonding formula
This blue geometric #mani looks great with silver #hexagonglitter!#silverglitterhttp://buff.ly/1VLOe9h
Posted by Glitties Nail Art on Tuesday, August 25, 2015
#Chevronmani with silver #hexagonglitter
#silverglitter
https://t.co/NBEfhnpHhP pic.twitter.com/hF2heyE0BI
— Glitties Nail Art (@rockstartoes) August 22, 2015
Friday, July 31, 2015
DIY Hexagon Glitter Nails
Hexagon glitter transforms your nails to an all purpose look year round. It's not just a seasonal look. We've found some of the best hexagon glitter looks you can pull off with ease! Trust us, it's a lot easier than it looks ;)
Use pre mixed hexagon glitter, or make your own custom mix! This is where your creativity takes over and sets your look apart from the rest. You'll be dying to try out some hexagon glitter once we're through with you!
Colorful #gradientnails with silver #hexagonglitter
#silverglitter
https://t.co/1YoJxiclhv pic.twitter.com/Gyzcsp2OPf
— Glitties Nail Art (@rockstartoes) July 26, 2015
What You'll Need:
- Hexagon glitter
- Bonding formula
- Sealing formula
- Franken formula (if you're creating your own hexagon glitter mix.)
- Nail polish
How To Create:
- Start out with the nail polish base you want. This nail artist used a colorful nail polish gradient and used the hexagon glitter to accentuate the colorful nails.
- Apply the bonding formula once your nail polish has dried.
- Sprinkle on hexagon glitter to your desire. You can use a pre mixed hexagon glitter or you can create your own custom mix.
- Once your glitter is applied, brush on your sealing formula and allow to dry for 3-5 minutes.
- Repeat last step once the first coat of sealing formula has dried.
- Share your creation!
Another design that's somewhat similar in creating as the first look. The hexagon glitter in this mani is used as an accent nail instead of the main event.
What You'll Need:
- Hexagon glitter
- Bonding formula
- Sealing formula
- Franken formula (if you're creating your own hexagon glitter mix.)
- Nail polish
- Nail tape
How To Create:
- Create the nail art look you want to sport. We love the chevron and solid polished nails used in this interpretation.
- If you want to create a chevron nail, check out our DIY Chevron Mani blog post for directions.
- Prep your glitter nail with a thick wet coat of bonding formula.
- Apply your hexagon glitter to the bonding formula.
- Once your glitter is applied, brush on your sealing formula and allow to dry for 3-5 minutes.
- Repeat last step once the first coat of sealing formula has dried.
- Share your creation!
Turtles on #holographicglitter nails!
#hexagonglitter #nailart
https://t.co/1YoJxitW93 pic.twitter.com/hHu6F8YNVm
— Glitties Nail Art (@rockstartoes) July 20, 2015
Yes we know that circular glitter is used on this mani, but just imagine it with hexagon glitter instead! Hexagons would create a very oceanic scale texture. Can't help but picture the beauty!
What You'll Need:
- Hexagon glitter
- Bonding formula
- Sealing formula
- Orange sticks
- Nail polish
- Nail polish sticks
How To Create:
- Create the ocean water look with a gradient nail polish base.
- Create a gradient nail by putting the two colors you want on a makeup sponge and blend the colors together. Then apply to nails.
- Apply bonding formula
- Use the orange stick to apply your iridescent hexagon glitter one at a time in the pattern you desire. You can place them to touch each other, or leave space in between each.
- Apply Sealing formula and allow to dry for 3-5 minutes.
- Repeat.
- Use your nail polish sticks to create your sea turtles.
- Share your creation!
Summer ice cream nail art with #hexagonglitter!#silverglitter #blueglitter #Summernailshttps://shop.glitties.com/color/metallic-glitter/silver-hexagon-.040
Posted by Glitties Nail Art on Thursday, July 30, 2015
Strawberry nails with red glitter for you sweet tooth!#redglitter #hexagonglitter #glitterhttps://shop.glitties.com/color/red-glitter/ruby-red-hexagon-.040
Posted by Glitties Nail Art on Wednesday, July 15, 2015
#WallE looks awesome with silver #hexagonglitter!
#silverglitter
https://t.co/1YoJxiclhv pic.twitter.com/9ZxZEf4wc5
— Glitties Nail Art (@rockstartoes) July 19, 2015
Friday, July 10, 2015
DIY Summer Beach Nails
Ocean nail art with iridescent hexagon glitter#iridescent #hexagon #glitterhttp://shop.glitties.com/iridescent-yellow-p400.aspx
Posted by Glitties Nail Art on Tuesday, June 30, 2015
There are a lot of fish scale looks in beach nail art designs, and just as many ways to pull off the fish scale look. This unique look uses hexagon glitters strategically placed to create that scale texture! And the best part, it's super easy to create:
Things You'll Need:
- Hexagon glitter
- Orange stick
- Sealing formula
- Bonding formula
How To Create:
- Apply a thick coat of bonding formula to your nails.
- Using your orange stick, place your hexagon glitter one at a time so they touch each other in the pattern shown.
- Apply your sealing formula and let dry for 3-5 minutes.
- Apply a second coat and let dry for 3-5 minutes.
Things You'll Need:
- Glitter powder
- Sealing formula
- Bonding formula
How To Create:
- Pick one or two accent nails to apply your glitter to.
- Apply a thick coat of bonding formula to your nails.
- Pour glitter powder to the nails.
- Apply your sealing formula and let dry for 3-5 minutes.
- Apply a second coat and let dry for 3-5 minutes.
This #mani is all about #RainbowFish! Loving the #glitterpowder
#goldglitter
https://t.co/omWGFRLucM pic.twitter.com/tzUrqLbigu
— Glitties Nail Art (@rockstartoes) July 8, 2015
This more complicated look can still be pulled off with the right tools. Who wouldn't be mesmerized by a fish scale mani that resembles the rainbow fish?
Things You'll Need:
- Nail polish
- Circular nail tape
- Glitter powder
- Sealing formula
- Bonding formula
How To Create:
- Create a base color with the polish of your choice.
- Using the circular nail tape, add more colored polishes in a scale pattern.
- Once polished scales have dried, choose a select few to cover with bonding formula.
- While formula is still wet, sprinkle glitter powder.
- Apply bonding formula and let dry for 3-5 minutes.
- Apply a second coat and let dry for 3-5 minutes.
Missing the open sea? You'll die for this sailor mani!#blue #hexagon #glitterhttp://shop.glitties.com/cobalt-blue-hexagon-p78.aspx
Posted by Glitties Nail Art on Saturday, April 11, 2015
Gorgeous #beachnails dusted with #goldglitter!
#glitterpowder
http://t.co/oJmPMW3FHN pic.twitter.com/zTsV3bB9Sd
— Glitties Nail Art (@rockstartoes) July 7, 2015
Another stunning take on #beachnails with #goldglitterpowder
https://t.co/omWGFRLucM pic.twitter.com/pxKesDRvTW
— Glitties Nail Art (@rockstartoes) July 3, 2015
Gorgeous sea inspired #mani with green #hexagonglitter!
#greenglitter
https://t.co/CkYhssICp7 pic.twitter.com/qzuj5DyGug
— Glitties Nail Art (@rockstartoes) July 2, 2015
Friday, June 26, 2015
Adding a Glitter Accent to Your Mani
What You'll Need:
- Base polish
- Nail polish
- Glitter
- Bonding Formula
- Sealing Formula
- Start by polishing your nails an even coat with the color of your choice (blue is used in this example).
- Paint a second coat, and make sure to get the edges of your nails to prevent chipping!
- Create the chevron look by placing nail tape and painting with your second color.
- Create your glitter accent nail! We love the use of silver hexagon glitter on this. You can do this one of two ways:
- Once again, polish those nails!
- Give your nails a second coat and paint the edges.
- To create the colorful polka dots, use a dotting tool. Don't have a dotting tool? You can actually use a Q-tip, but your polka dots with be a larger size.
- Create your glitter accent nail by following the same guidelines as shown above.
Warm #ombremani with #silverglitterpowder accent nail
https://t.co/uTuIcf0a9M pic.twitter.com/91XtWpZRaR
— Glitties Nail Art (@rockstartoes) June 20, 2015
- Create an ombre effect by putting the two colors you want on a makeup sponge and blending with a brush.
- Take the blend on the sponge and apply it to your nails
- To create the glitter accent design, tape off the sections you don't want the glitter on with nail tape.
- Apply glitter. We recommend applying glitter directly to the nail with this one!
Friday, June 19, 2015
4th Of July Glitter Mani
What You'll Need For These Looks:
- Base polish
- Red, white, and blue nail polishes
- Glitter
- Bonding Formula
- Sealing Formula
- Orange stick
- For this Independence Day look you'll want to start with a base of the color of polish you'd like for each individual nail. We see some variations of reds and blues, it works really well!
- Use nail tape to create clean cute lines needed for the flag accent nail and for the stripes on the blue nail.
- Create a silver glitter polish or apply the silver glitter directly to the nail.
- Don't forget to add that star glitter wherever your heart tells you to!
- Follow the same basic steps as above for the polish and glitter powder nails
- Use your own creative glitter mix by following the instructions here
- Place white (or any color) hexagon glitter on your blue polished nail by using an orange stick
Friday, June 12, 2015
Make Your Own Chevron Glitter Mani
What Will You Need?
- Base polish
- Bonding Formula
- Sealing Formula
- Nail polish
- Glitter/Glitter polish
- Orange Stick
- Nail tape/scotch tape
Start With Glitter
You can apply the glitter to your nails one of two ways: a glitter polish, or directly to the nails. Don't have a glitter polish and want to make your own? Our Gradient Glitter Nails blog post has all the details on making your own glitter polish.So if you choose the glitter polish the application is pretty self explanatory. Apply a base coat, allow to dry, apply glitter polish. Not too difficult, right?
However, if you want to apply glitter directly to your nails it's gonna take a few more steps:
- Apply base coat to prevent discoloration and let dry.
- Place hand on heavy piece of card stock to catch excess glitter.
- Apply Bonding Formula.
- While Bonding Formula is still wet, sprinkle a generous amount of glitter onto your nails. With your finger, push the glitter gently into the bonding coat. Repeat the process until all 5 fingers are complete. Shake excess glitter onto the paper. Using an orange stick, carefully remove excess glitter from around the nail.
- If the glitter doesn't stick to a small area, or you desire your glitter color to be darker, repeat step 2 and 3 to the entire nail
- Complete the steps above on other hand and let nails dry for 3-5 mintues.
- Apply a second layer of Bonding Formula over the top of the glitter. Again, include the front edge.
- To save excess glitter, fold the paper in half and let the extra glitter slide into its jar.
- Apply Sealing Formula and let dry for 3-5 minutes.
- Apply second layer and let dry for 3-5 minutes.
- When nails are dry, brush or wash off any excess glitter.

Get Your Chevrons On!
- Apply nail tape (or scotch tape) in a "V" shape as many or as few times as you want.
- Paint your nails!
- Remove nail tape from nails
- Love your nails!
Friday, May 29, 2015
How To: Gradient Glitter Nails
Blue nails with gold glitter powder and hexagons. Pinterest find#gold #hexagon #glitterhttp://shop.glitties.com/metallic-sunburst-p192.aspx
Posted by Glitties Nail Art on Tuesday, May 5, 2015
So what will you need?
- A base coat to protect your nails from discoloration
- Nail polish (whatever color you want your base to be)
- Solvent resistant glitter
- Franken Formula (to prevent glitters from sinking)
- Orange stick
- Franken Ballz
- Jar
Create A Glitter Polish
- Use any color and shape combo your heart desires (although we suggest starting out with a simple powder if this is your first time) in an empty jar.
- Place a few drops, or a small amount of suspension base nail polish on a paper plate. Don't be afraid to use a little portion of the nail polish to test. Shake in a bit of the glitter combo you've already created into the few drops of polish
- Use your orange stick to mix the glitter and polish together. After mixing, do a test swatch on paper or a nail. Feel free to experiment until you get your perfect look!
- Place a funnel into the top of the Franken Formula or polish bottle. Slowly add glitter into the bottle.
- Add a couple of Franken Ballz, and shake! Test your mixed glitter polish on a nail. Add more glitter as needed.
Nail Time!
- Start by applying a base coat to your nails to prevent and color from bleeding through and staining your nails. (Stained nails ain't pretty!)
- Once base coat is dry, apply 1-2 coats of the colored polish you've chosen for your look.
- Once your color has dried, apply a light coat of your glitter polish on the tips of your nails in a "C" shape. Make sure this coat is only lightly glittered.
- Now lay on another coat of the glitter polish in a "C" shape closer to the tip of the nail.
- Repeat this getting closer and closer to the tip of the nail until you get the gradient effect that you want.
Pink cheetah print mani with silver glitter powder
#silver #glitter #powder
http://t.co/kpvfanKH7s pic.twitter.com/lJy4z297nL
— Glitties Nail Art (@rockstartoes) May 18, 2015
Pink nails with silver hexagon glitter
#silver #hexagon #glitter
https://t.co/1kesOM2pKd pic.twitter.com/AHf6YIsDcl
— Glitties Nail Art (@rockstartoes) May 21, 2015
Friday, May 22, 2015
Glitter Kits Are Here!
What kits do you have to choose from?
There's also a Matte Hexagon kit for you opaque matte lovers! These mattes come in beautiful pastel colors for a more subdued colorful look.
XOXO,
Friday, May 8, 2015
#FridayNight, Glitter Night
There's a lot to do on a Friday night, so why not add a little glitter to it? You can use any amount and type of glitter for any occasion.
The Glitter Mani
Glitter Eye Makeup
Accessorize With Glitter
Friday, May 1, 2015
Feature Friday
Friday, March 27, 2015
Feature Friday
Looks like another hot '80's mani! Pinterest find#retro #nailart #manihttp://buff.ly/1LSsvGW
Posted by Glitties Nail Art on Monday, March 23, 2015
Add some hexagon glitter to your mani to spice things up!#white #hexagon #glitterhttp://shop.glitties.com/diamond-dust-hexagon-040-p469.aspx
Posted by Glitties Nail Art on Thursday, March 26, 2015
Monday, March 16, 2015
Best Glitter DIY's This St. Patrick's Day
![]() |
Creative use of gold hexagon glitter in this St. Patty's Day manicure! Why paint pieces of gold when you can use glitter and create a more realistic look? |
![]() |
Cute, cute, CUTE! Who would've thought you could improve an already adorable green shamrock bow just by adding glitter? You could easily use green hexagon, square, flitter, or powder glitter to make any shamrock pop! (You'll probably want to invest in Mod Podge for this one too) We've got lots of green glitters to choose from at http://shop.glitties.com/green-glitter-c36.aspx |
![]() |
Believe it or not, you can actually make this glitter shamrock onsie for your little one in as little as five minutes! You just need some green glitter powder and the How-To instructions http://www.practicallyfunctional.com/diy-st-patricks-day-baby-onesie/ |
![]() |
No one will be able to pinch you when you're sporting this glitter powder eye! And you're sure to stun in the process, that's what we call a win win :) |
Friday, February 27, 2015
Feature Friday: Disney Inspired Nail Art
This Winnie The Pooh nail art is pretty much the cutest thing we've seen! Can't go wrong with that honey comb detailing either :)
What little girl didn't wish she was Ariel at one point? If you can relate we're sure this Little Mermaid mani is bound to be your fav! You definitely can't go wrong with a little blue glitter powder either! All of these Disney nail art designs are so awe inspiring, how can you choose a favorite?! Let us know what you think!
Friday, October 3, 2014
Feature Friday
We're not surprised at all that a Disney themed manicure made the list. And with an addition of some beautiful purple glitter powder, it's no wonder this Ursula nail art is so popular! Doesn't that purple glitter really set this Disney mani apart from the others?
Fall nail art is the big trend we can always rely on this time of year. After a season of sunny bright colors, it's nice to see some reds and greens! We absolutely love this Fall tree nail art design, but can't help but imagine it with some glitter powder.
Even a simple single color of polish can win over a crowd! Let's be honest though, the silver hexagon and powder glitter definitely helped. Anyone can spice up a simple mani with a touch of glitter and look like a pro!
We had to share our most popular Halloween movie mani! Who can be surprised that Hocus Pocus won the title?
Friday, September 12, 2014
Feature Friday!
Now this mani was one of our absolute favorites of the week! We see so many soft and sweet nail art looks that it's a real treat when we see something completely bold and dangerous! If this mani isn't scary good, then who knows what is? The brilliant use of holographic silver hexagon glitter makes it even more bold. We're happy to see plenty of holographic glitter this week!
We don't often see nail art completely without polish. When polish is absent, typically glitter is present, but of course this mani is a completely fun surprise! While this look probably isn't the funnest to create, looking at it is a blast.
Of all the glitter we see used in nail art, glitter powder is by far a nail artist's favorite. This silver glitter powder looks absolutely beautiful against this black sleek polished mani. It's always great to see the contrast of glitter against polish taken further with color.
Silver glitter powder used in a brilliant chevron styled mani. Chevrons are one of the biggest nail art trends that will probably last a lifetime. And as always, it's great to see these trends enhanced with a silver holographic glitter powder. What is it about glitter that makes any mani better?
Friday, August 22, 2014
Feature Friday!
Wednesday, July 2, 2014
Our Favorite July 4th Glitter Ideas!
![]() |
This 4th of July themed mani has a beautifully crafted American flag made of red, white, and blue hexagon glitters! Not too shabby, right? |
![]() |
Balloons and glitter are pretty much a match made in heaven! We can just imagine keeping the kids busy with these glitter filled balloons! (Best used outside to keep the mess out of the house!) |
![]() |
This is the perfect way to go for the classic manicure lover who wants to show some patriotic spirit! This classic french manicure turned USA glitter mani has blown us away! |
So, what do you think of these 4th of July glitter projects? If you like what you see and want to recreate it, check out all the glitters you'll need here!
We hope you have a fantastic holiday with your friends and family! Remember that we're not celebrating fireworks and parades, we're celebrating our freedom as a nation!
XOXO,
Glitties